How to Style an Afro Bohemian Office
The office is the one room in the house where styling sequence has a functional consequence.
In the living room, adding the gallery wall before the sofa is in place produces a compositional misalignment — but the room still functions as a living room. In the office, applying the maximalist layer to the wrong zone — concentrating pattern and visual complexity at the desk surface rather than at the walls and floor — produces a room that looks correct but exhausts the person working in it.
The sequence isn’t just about compositional logic. It’s about ensuring that every element ends up in the zone where it performs best — aesthetically and functionally.
This guide covers the full styling process in the order that protects both outcomes simultaneously.
Quick Takeaway:
- The desk zone and the peripheral zones are styled as distinct systems — the desk gets three tactile objects, the walls and shelves get the full maximalist layer.
- The gallery wall is built before the reading nook is furnished — the wall’s visual weight determines how much the nook needs to contribute to the room’s overall richness.
- The tech-organic balance is resolved before the room is considered complete — visible cables and plastic tech accessories are the single most common element that breaks the aesthetic’s coherence from inside an otherwise correctly assembled room.
Step 1: Set the Lighting Architecture Before Anything Enters the Room
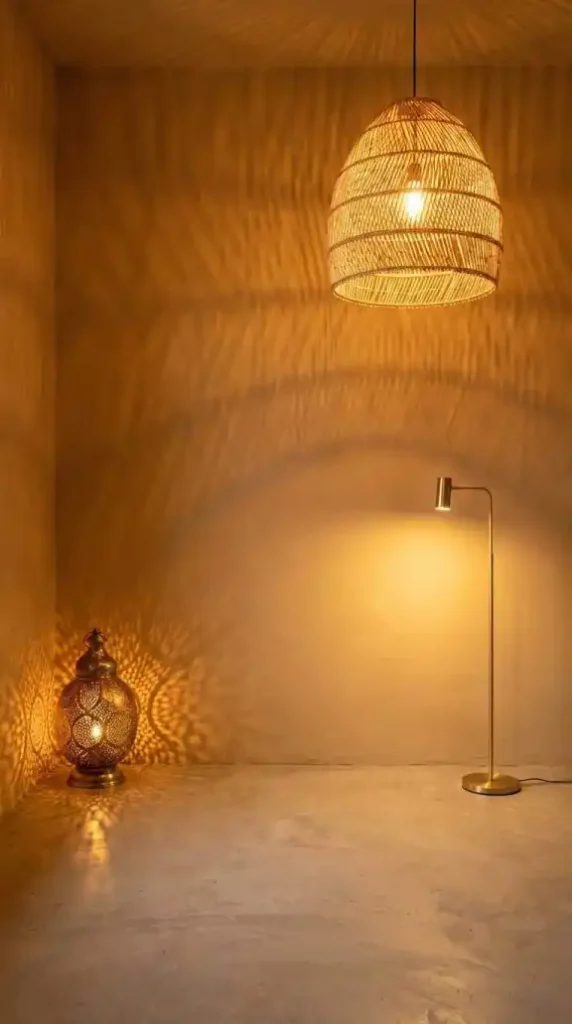
The lighting architecture is installed before the desk, before the rugs, and before any object enters the room.
This is the rule that produces the most consistently correct results in any Afro Bohemian room — and it matters more in the office than anywhere else because the lighting serves two distinct functional purposes simultaneously.
The raffia or rattan pendant provides the room’s primary atmospheric source and its ceiling-level shadow projection layer. Install it first and evaluate where the shadow projections land on the walls — these projections will inform which wall gets the gallery composition and which wall the pendant’s shadow depth will enhance rather than compete with.
The brass desk lamp establishes the task light position before the desk is placed. Set it on the floor at the approximate desk position and evaluate the light pool it casts. The lamp should rake light across the future desk surface from the side — not from directly above. Adjust the planned desk position so the lamp’s side-raking light is the primary task illumination.
The Moroccan lantern in the reading nook corner establishes the third light source at the peripheral zone. Position it on the floor where the nook side table will eventually sit and evaluate the geometric pattern projections it casts onto the adjacent wall. This wall — animated by the Moroccan lantern’s projected patterns after dark — becomes the nook’s visual backdrop and the most atmospheric surface in the office.
All three at 2700K. Replace every existing bulb in the room before this step. The earth pigment surfaces — the ochre plaster wall, the teak and walnut wood finishes, the terracotta objects — read correctly only under warm light conditions. Evaluating the room under cool-white fluorescents and then switching to warm lighting after styling means every decision made in the interim was made under false conditions.
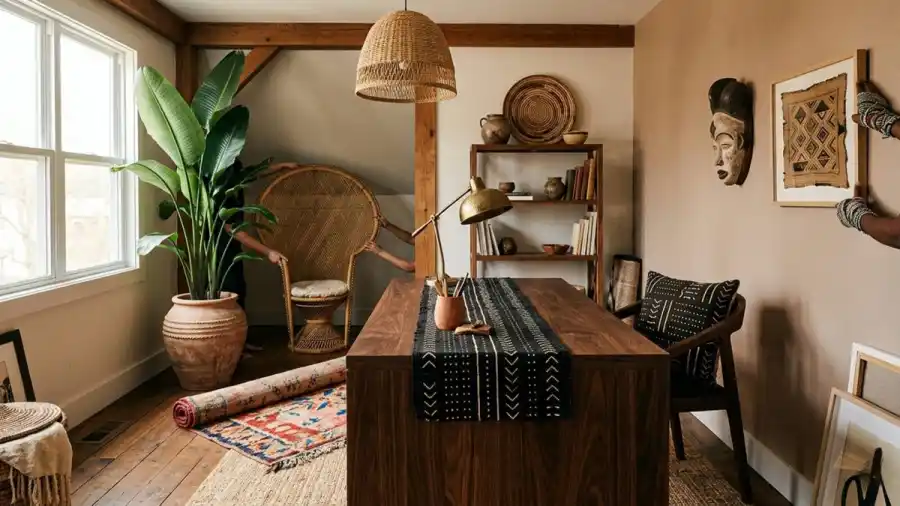
Step 2: Position the Desk and Confirm Its Orientation
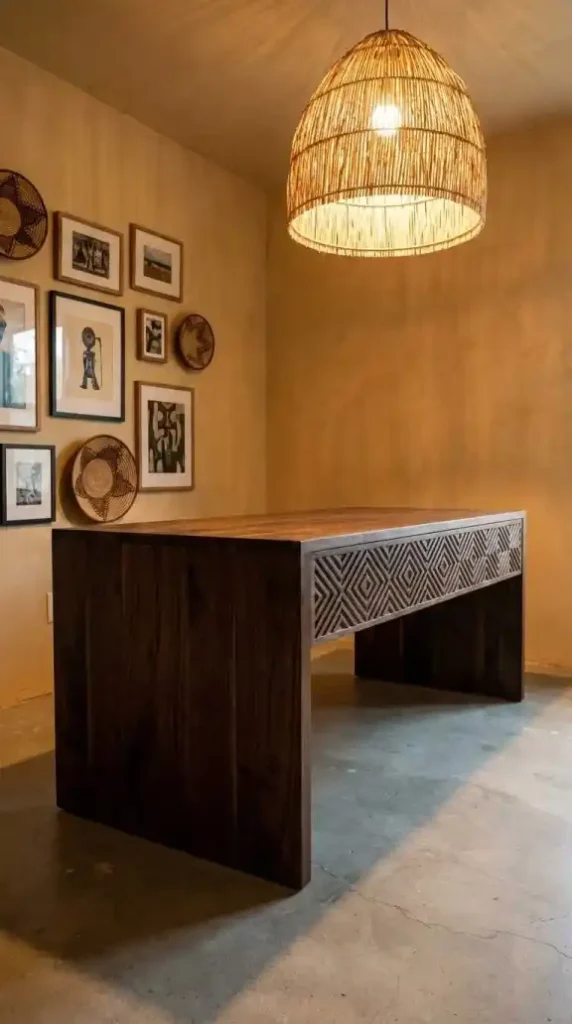
The desk is the second element positioned — after the lighting — because its orientation determines the functional logic of every zone in the room.
Place the reclaimed dark walnut or ebony-stained desk so the primary gallery wall is visible in the peripheral sightline from the seated position rather than directly in the forward focus zone.
The gallery wall should be readable peripherally — the carved mask and framed textile fragments visible at the edge of vision while working — but not positioned so that looking up from the screen means looking directly into the gallery’s full visual complexity.
That peripheral relationship is what makes the gallery wall restorative rather than distracting during long working sessions.
Confirm the carved geometric motif detail on the desk face is visible from the room entry point.
The desk’s decorative surface faces outward — toward the room, not toward the wall — which means the hand-carved motifs are the first detail a visitor reads when entering the office. That front-facing cultural statement is the desk’s contribution to the room’s gallery logic at the furniture scale.
Step 3: Style the Desk Surface
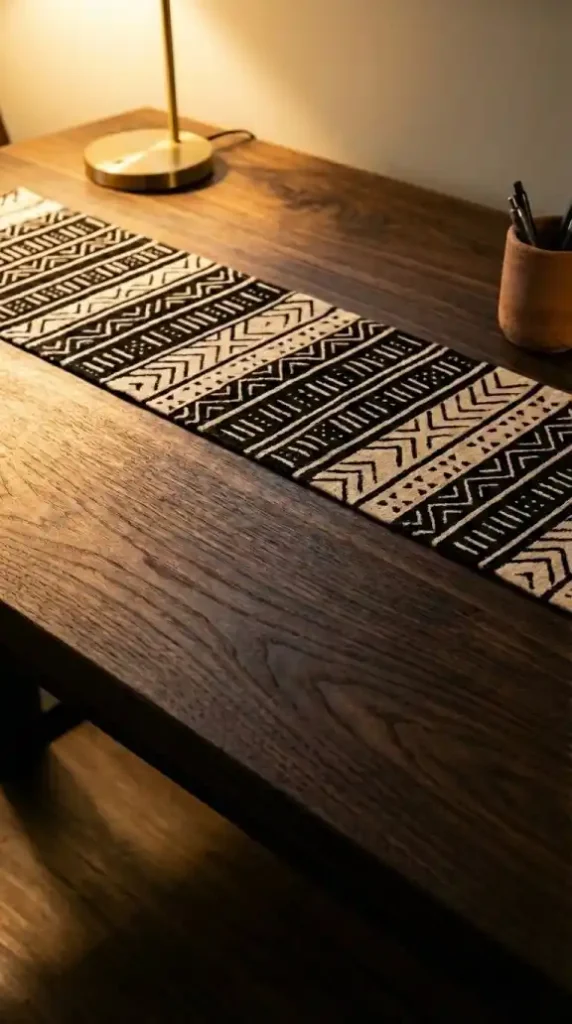
The desk surface is styled immediately after the desk is positioned — before the rugs, before the shelves, and before the gallery wall.
Styling it early establishes the minimal tactile register that the desk zone operates on — and seeing that established restraint while the rest of the room is styled prevents the instinct to add more objects to the desk as the room fills in around it.
Three objects. Added in sequence. Evaluated after each addition.
First: the short mud cloth runner laid across the center section of the desk. Not a full desk covering — a runner that spans approximately one third of the desk width. The raised cotton weave adds tactile texture at close range without introducing the pattern complexity that a full mud cloth surface creates at sustained viewing distance. The hand rests on it. The eye passes over it.
Second: the minimalist brass desk lamp positioned at the non-dominant side corner. The brass finish is the desk’s most contemporary element — and its slim modern form is precisely what makes the organic elements around it read as intentional craft rather than accumulated decoration.
Third: the small terracotta vessel holding pens, pencils, and stationery at the opposite corner from the lamp. Functional. Rough unglazed clay surface. Earth pigment tone that reads as cohesive with the walnut grain beneath it.
Step back. The desk is complete. Everything that arrives in subsequent steps belongs at the walls, shelves, floor, or corners — not here.
Step 4: Lay the Floor Layer
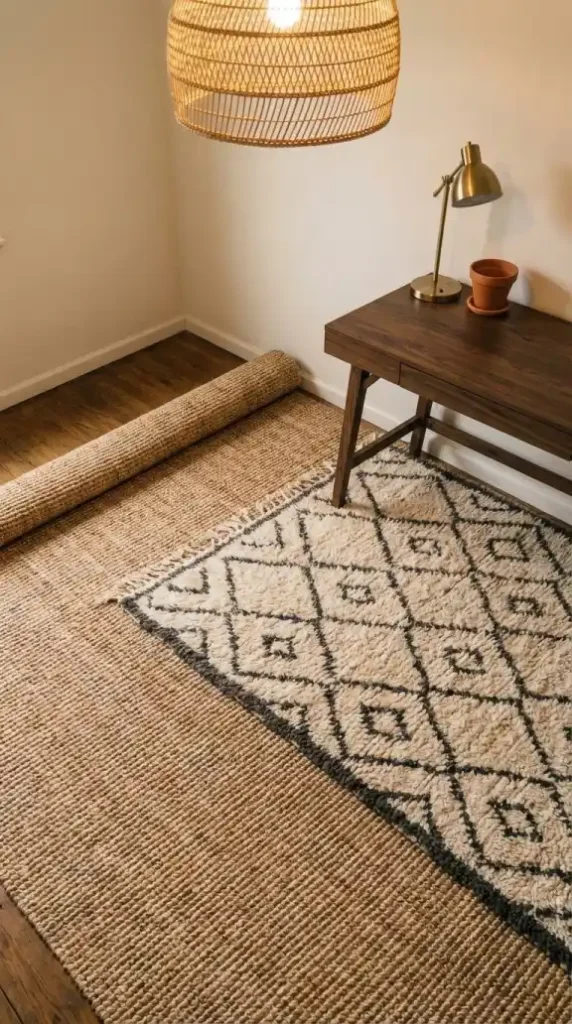
The floor layer is laid after the desk is positioned and styled — because the desk position determines where the rug’s center needs to sit relative to the chair’s rolling zone.
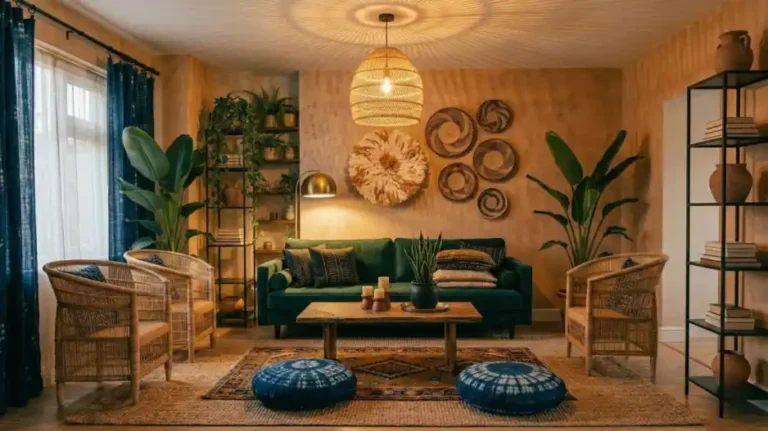
Roll the large jute or sisal base rug out first — extending it under the full desk zone, the reading nook corner, and the floating shelf wall position. The jute base should cover the majority of the office floor plane. A rug that stops before reaching the room’s secondary zones creates visual disconnection between the work zone and the rest of the office.
Then position the Moroccan Berber rug on top at the desk chair’s visual center — large enough to be visible from the entry point as the floor’s primary pattern layer, positioned so the desk chair rolls primarily on the jute base rather than the Berber pile.
Confirm the Berber’s geometric diamond pattern in cream and charcoal reads correctly under the 2700K pendant before accepting the rug as correct.
Under warm light the cream reads as ivory and the charcoal deepens — both sitting within the High Contrast palette category at the floor level. Under cool white the cream goes cold and the charcoal flattens. If the rug looks correct under your warm pendant and wrong under your overhead downlight the issue is the remaining cool-white bulbs — not the rug.
Position a flat-woven kilim in the reading nook corner area — the secondary floor layer at the peripheral zone. The kilim’s geometric pattern in earth tones connects the nook floor to the desk zone’s rug composition without requiring the nook to have its own full rug layer.
Step 5: Install the Floating Shelves and Style Them
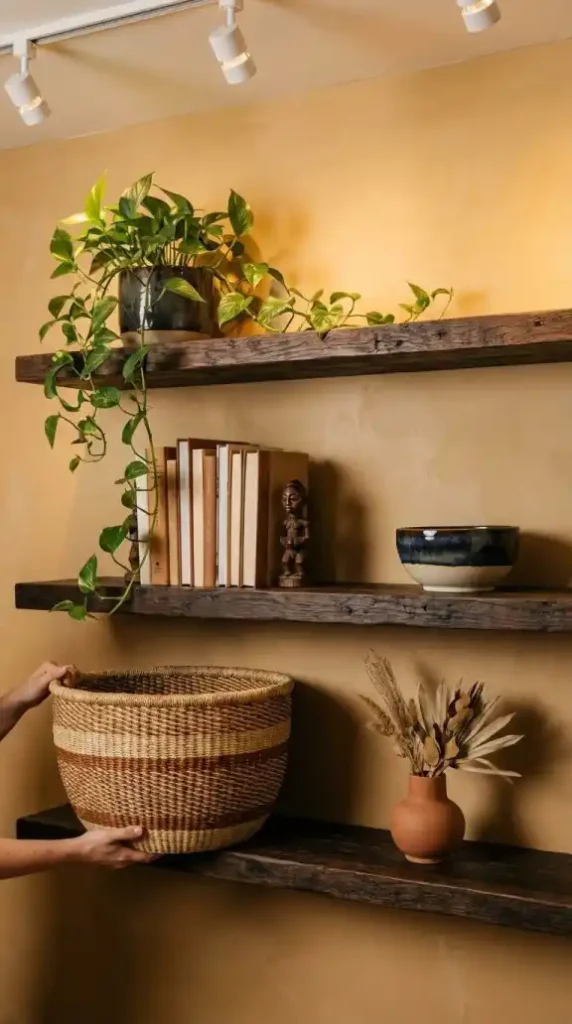
The floating shelves are installed on the wall adjacent to the gallery wall — not on the gallery wall itself. Two distinct wall surfaces. One carries the heritage gallery. The other carries the functional display shelving. The distinction between them is what gives each wall a clear primary purpose.
Style the shelves from bottom to top — one shelf at a time, evaluating each level before moving to the next.
Bottom shelf: the large Bolga basket at one end — positioned with its woven exterior facing outward and the power strip and cable management system loaded inside. A small terracotta vessel with dried botanicals at the other end. Deliberate negative space between the two objects.
Middle shelf: books in earth-tone spines stacked at varying heights. A small African carved statue positioned between two book stacks — the figurine that carries the cultural heritage object reference at the shelf’s mid-scale. A glazed ceramic bowl at one end — the smooth surface providing contrast against the rough unglazed terracotta and carved wood around it.
Top shelf: the trailing Pothos in a dark ceramic planter at one end — positioned so the cascading vines have maximum fall distance before reaching the shelf below. The trailing growth fills the space above the shelving over time rather than requiring immediate styling — the plant grows into its position.
Step back after each shelf level and evaluate the full shelving composition before moving upward. The shelves should read as progressively lighter from bottom to top — the heaviest visual weight at the Bolga basket level, the lightest at the trailing plant level.
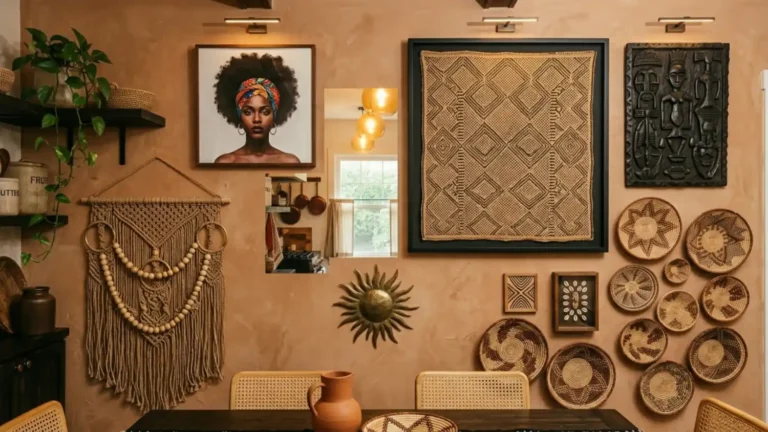
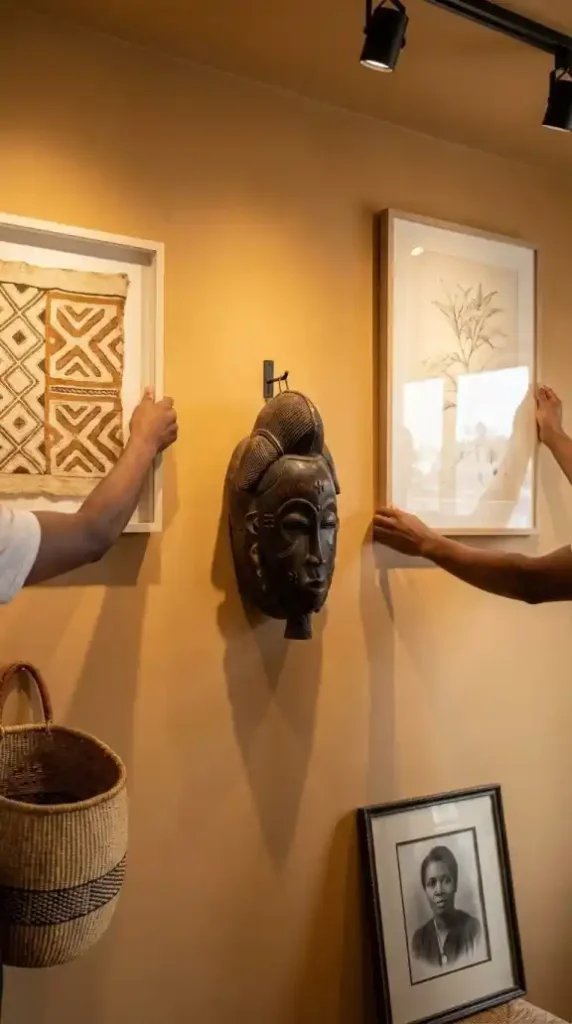
Step 6: Build the Gallery Wall in Four Layers
The gallery wall is built after the shelves are styled — because the shelf’s visual weight on the adjacent wall determines how densely the gallery wall needs to be composed to balance the room’s overall visual distribution.
Four layers. Specific sequence. Each layer evaluated before the next is added.
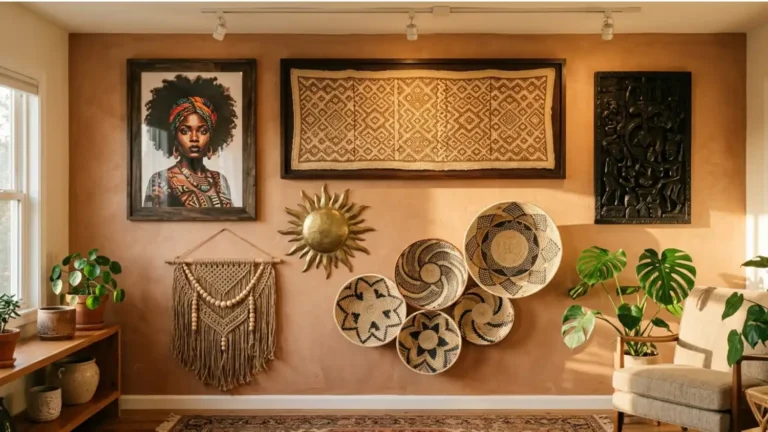
Layer one: the African carved mask. Mount it on a museum bracket at the gallery wall’s visual center — approximately 165cm from floor to mask center. This is the gallery’s primary focal point and its center axis. Confirm its position before adding anything beside it. The mask carries the most cultural weight and the most three-dimensional surface detail of any gallery element — its position determines everything that follows.
Layer two: the framed Kuba cloth textile fragment. Position it to the upper left of the mask — stretched and mounted like art, its dense raffia-inspired geometric pattern adding texture at the mid-scale gallery layer. The upper left position creates the gallery’s first asymmetric movement — drawing the eye upward and left from the mask’s center point.
Layer three: botanical sketches and vintage photography in dark wood frames. The botanical sketch at the upper right of the mask — creating the second asymmetric movement upward and right. The vintage grainy photography portrait at the lower right — pulling the gallery composition downward at a third point. The three framed pieces and the mask now create a loose diamond composition around the center axis.
Layer four: the Bolga basket hung as a wall element at the gallery’s lower left position — its circular coiled form providing the organic shape that breaks the rectangular geometry of the framed pieces. Small bronze hook mounting. The circular basket at the lower left completes the gallery’s four-point composition and introduces the natural fiber vocabulary to the wall layer.
Step back after each layer. The gallery should read as progressively richer — not progressively busier. If any layer tips the composition from rich to busy identify the most recently added element and reduce its size or relocate it rather than removing it entirely.
Step 7: Hang the Window Textile
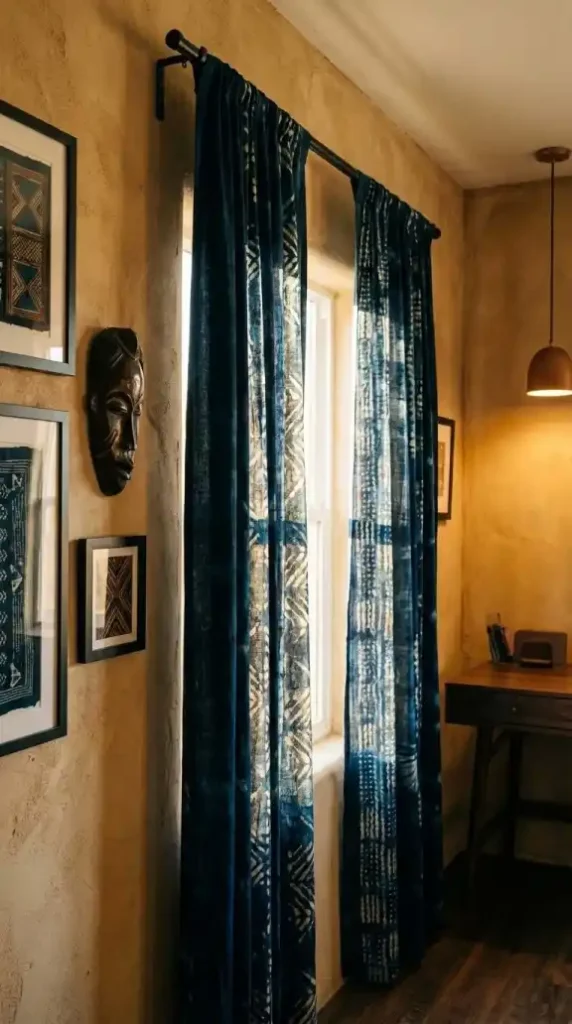
The window textile goes up after the gallery wall is assembled — because the curtain’s color needs to respond to the gallery wall’s palette rather than lead it.
If the gallery wall is carrying significant warm earth tones — ochre, terracotta, warm brown in the Kuba cloth and wooden mask — the deep indigo Yoruba batik curtains provide the cool contrast that prevents the office from reading as uniformly warm.
The hand-dyed wax-resist indigo filters afternoon light through a cool blue-toned fabric that creates a visual shift in the room’s color temperature at the window zone — warm earth tones throughout the room’s peripheral surfaces, cooling indigo at the natural light source.
This warm-cool contrast is the palette’s Life tone accent operating at its largest textile position in the office.
Hang the panels from a slim matte black curtain rod — connecting the curtain’s matte black hardware to the broader modern minimalist thread of the Bolga basket leather cord organizers and the minimalist brass desk lamp at the desk zone.
If the room’s indigo allocation is already fulfilled through rug or cushion accents, mud cloth curtain panels in black and cream are the alternative — delivering the High Contrast palette component at the window position rather than the Life tone cooling accent.
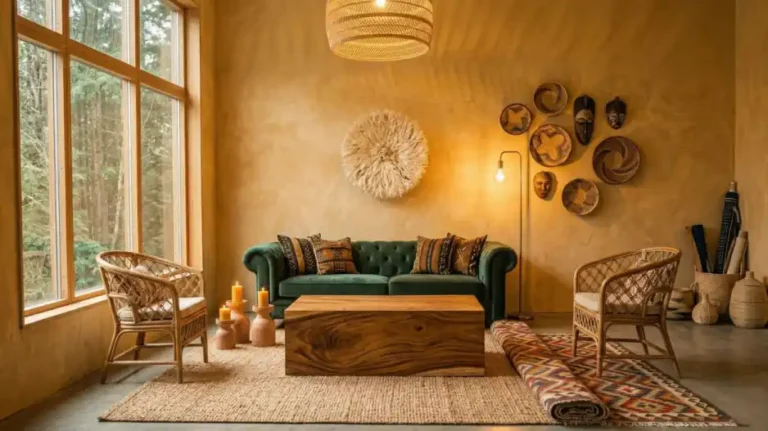
Step 8: Furnish the Reading Nook
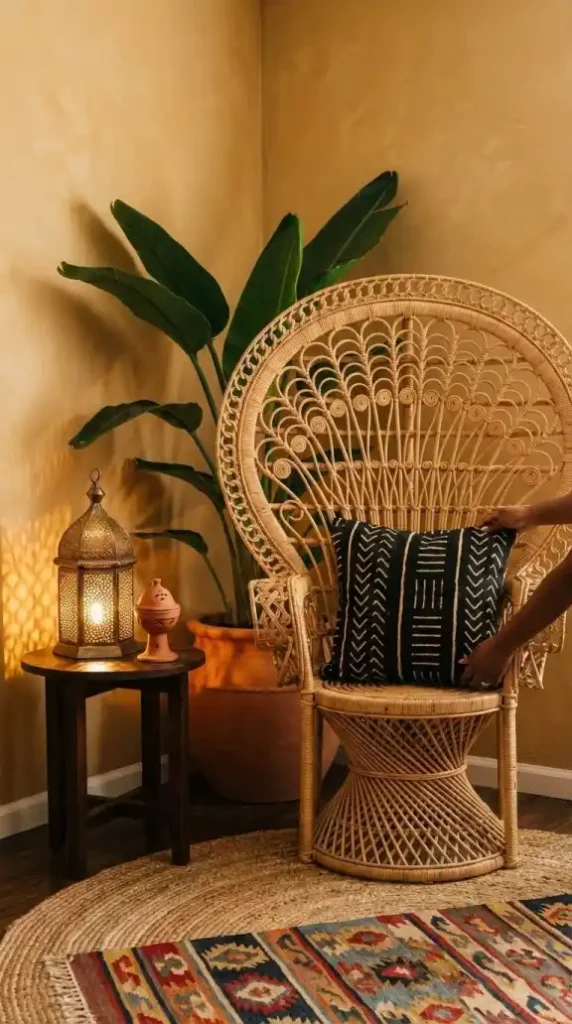
The reading nook is furnished after the gallery wall and window textile are in place — because the nook’s visual contribution to the room needs to be calibrated against the gallery wall’s richness rather than developed independently.
A gallery wall with four strong elements already carrying significant visual weight means the reading nook can stay relatively restrained — the peacock chair, the mud cloth cushion, the Moroccan lantern, and the Bird of Paradise are sufficient without adding more objects.
A gallery wall at earlier stages of development means the nook can carry additional visual weight — a second basket element, a small framed print, an additional terracotta object on the side table.
Position the rattan peacock chair so its fan-shaped back is fully visible from the desk chair position. The peacock chair’s distinctive silhouette should read as a design element from across the room — not compressed against the wall or obscured by the adjacent plant.
Place the mud cloth cushion on the seat — the soul layer at the nook’s most intimate textile position.
Position the small dark wood side table beside the chair. The Moroccan lantern on the table surface — the nook’s dedicated light source — and the terracotta incense burner beside it complete the nook’s sensory layer at the peripheral zone where creative thinking happens.
Place the Bird of Paradise directly behind the peacock chair — the broad tropical leaf silhouette framing the chair from behind and defining the reading nook as a distinct botanical zone within the office.
Step 9: Resolve the Tech-Organic Balance

The tech-organic balance is resolved as a dedicated step — not as an afterthought once the room looks correct visually.
Walk the room from the entry point and identify every visible cable, power strip, plastic tech accessory, and synthetic-material office object. These are the elements that break the aesthetic’s coherence from inside an otherwise correctly assembled room — and in the office they’re more numerous than in any other room in the house.
Cables and power strips: contained inside the large Bolga basket at the desk surface or shelf position. Load the power strip into the basket first, then route the necessary cables through the open weave at the basket’s back face. From the desk chair position and the entry point the basket reads as a decorative Ghanaian craft object. From the back — out of the primary sightline — the functional tech infrastructure operates normally.
Remaining visible cables: routed through tan or deep brown leather cord organizers along the desk back edge and down the desk leg. Leather reads as cohesive with the aesthetic’s material vocabulary. Plastic cable management clips read as intrusive regardless of their color.
Charging station: replaced with a minimalist brass wireless charging tray on the desk surface beside the terracotta vessel. The brass finish connects the charging function to the desk’s brass lamp accent — integrating the modern tech requirement within the contemporary minimalist thread rather than forcing it to exist as a separate category.
Monitor: positioned so the gallery wall reads as its background from the seated working position. Video calls project the heritage gallery — the African mask, the Kuba cloth fragment, the botanical sketches — as the visual backdrop. That’s not incidental. It’s the room’s cultural statement made visible to every person who joins a call.
Step 10: Place the Greenery at Three Zones
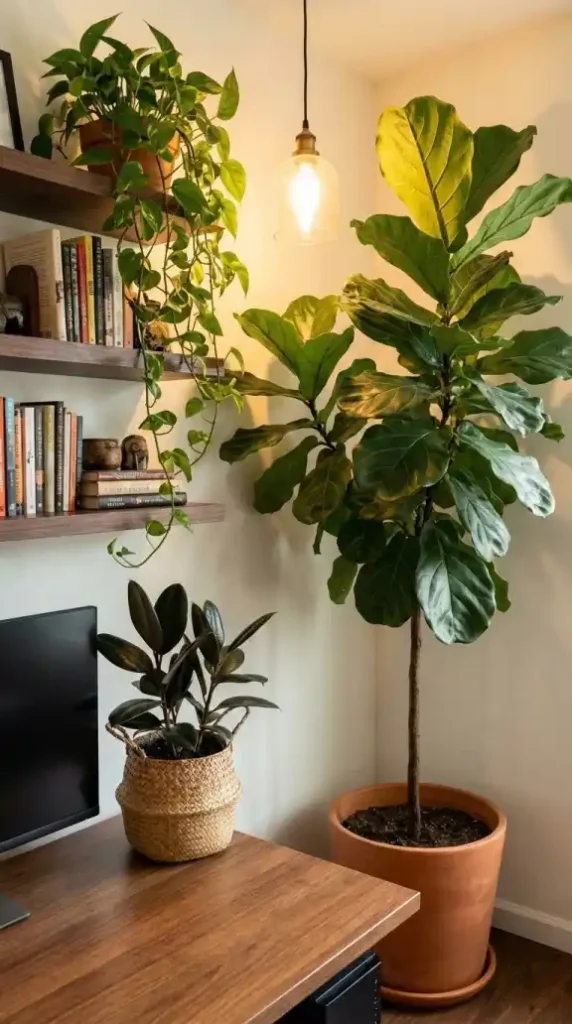
Greenery enters the office last — after every furniture, textile, wall, and tech element is in place — because each plant’s position is determined by the spatial gaps the assembled room reveals.
Three zones. Three plants. Three distinct spatial and functional contributions.
The large corner zone: a Fiddle Leaf Fig or Bird of Paradise in a terracotta pot at the office’s most open corner with access to indirect natural light. The broad tropical leaf silhouette fills the floor-to-ceiling zone — a foreground presence the working eye rests on during thinking pauses. Research consistently shows that large-leafed plants in workspaces reduce cortisol levels during sustained focus tasks. The terracotta pot grounds the plant within the earth palette at the floor level.
The high shelf zone: the trailing Pothos already positioned at the top shelf during the shelf styling step. Confirm its position now that the room is fully assembled — the cascading vines should fall freely without being blocked by shelf objects on the level below. If blocked, trim the lower shelf’s object arrangement to give the vines their fall clearance.
The desk zone: a small Rubber Tree in a woven basket planter at the desk surface corner — the final object added to the desk surface, positioned so the plant doesn’t extend into the monitor sightline. The Rubber Tree’s dark glossy leaves provide a distinct material register at the closest viewing distance in the office — smooth, deep-toned, alive — that the earth-pigment objects around it don’t provide.
Report all three plants before they enter the room. Terracotta for the floor corner plant. Dark glazed ceramic for the trailing shelf plant — already confirmed during the shelf styling step. Woven basket for the desk plant.
No plastic nursery pots visible in an assembled Afro Bohemian office.
Step 11: Complete the Sensory Layer

The sensory layer is the last thing added and the first thing experienced when entering the office.
Scent crosses the room before the eye has resolved any surface detail — and in a workspace, scent performs a specific cognitive function that visual elements can’t replicate. Sandalwood and frankincense have documented associations with reduced anxiety and improved focus in enclosed working environments. The incense burner on the reading nook side table delivers that function at the peripheral zone — in the room but not at the desk, present in the sensorium without demanding cognitive attention.
Light the Moroccan lantern in the reading nook. The geometric amber pattern projections animate the corner wall — the most atmospheric surface in the office after dark. The reading nook, already defined by the peacock chair, the mud cloth cushion, the Bird of Paradise, and the Moroccan lantern, now has its full sensory character: warm projected light, botanical presence, scent, and the tactile texture of the mud cloth cushion.
Sit in the peacock chair. Look at the room from the reading nook position.
The gallery wall should read as a composed heritage display from this secondary vantage point. The desk should read as minimal and purposeful — three objects on a dark wood surface under a warm brass lamp. The floating shelves should read as functional richness — Bolga baskets, books, terracotta, trailing Pothos. The layered rugs should ground the floor plane with two distinct material characters.
If the room reads as complete from the reading nook — the secondary position, the contemplative position — it will read as more than complete from the desk chair. The office is finished.
Final Room Audit: Reading the Space Before Calling It Done
Walk through the fully assembled office and answer these questions:
- Stand at the room entry point. Where does the eye land first? It should move to the gallery wall’s African mask or the reclaimed wood desk as the room’s two primary focal elements. If the eye lands on a visible cable, a plastic tech accessory, or a cool-white light source the tech-organic balance or lighting step is incomplete.
- Sit at the desk chair. Look straight ahead at the monitor position. Is the gallery wall visible in the peripheral sightline without being directly in the forward focus zone? If the gallery wall is in the direct forward sightline the desk orientation needs to shift before the room is considered complete.
- Count the objects on the desk surface. Are there exactly three — the brass lamp, the terracotta vessel, and the mud cloth runner? If there are four or more identify the most recently added object and relocate it to the shelf or remove it entirely.
- From the desk chair position scan the room for any visible plastic, chrome, or synthetic-material object. Cables, power strips, plastic cord clips, chrome stapler, synthetic fabric chair mat — all are material breaks that undermine the room’s coherence from the working position. Address each one through concealment or material substitution before adding anything further.
- Walk to the reading nook and sit in the peacock chair. Does the desk read as minimal and purposeful from this position? Does the gallery wall read as a composed heritage display? Does the Moroccan lantern’s geometric pattern projection animate the corner wall? If all three read correctly from the nook position the room’s two-zone logic is working.
- Check every plant pot. All terracotta, dark glazed ceramic, or woven basket? No plastic nursery containers visible? In a room where the working eye spends eight or more hours daily the material quality of every visible object matters more than in any other room in the house.
The Afro Bohemian office is styled in eleven steps — but the governing principle behind all eleven is the same.
Soulful maximalism belongs at the walls, floor, shelves, and corners. The gallery wall carries the heritage depth. The layered rugs carry the textile richness. The floating shelves carry the craft storage logic. The reading nook carries the contemplative warmth. The Bolga baskets carry the traditional craft form into the cable management function. The raffia pendant and Moroccan lantern carry the golden hour atmosphere.
The desk carries three objects.
That restraint at the desk — brass lamp, terracotta vessel, mud cloth runner — is not a compromise of the aesthetic. It’s the aesthetic’s most sophisticated expression: knowing exactly where maximalism belongs and where it doesn’t, and applying each with full commitment to the zones where they perform best.
A room that looks correct and functions correctly simultaneously. That’s the Afro Bohemian office at its fullest.
Keep building your Afro Bohemian office:
- Afro Bohemian Office: The Complete Style Guide —Get the complete design framework covering every zone, material, and lighting principle
- 11 Afro Bohemian Office Ideas for a Warm and Productive Space — Apply 11 targeted ideas broken down by desk surface, gallery wall, and reading nook position
- Afro Bohemian Office Decor Must-Haves for Beginners —Work through the beginner buying sequence before tackling the full eleven-step styling process