How to Style Afro Bohemian Wall Art in Any Room
How to Style Afro Bohemian Wall Art in Any Room
Styling a gallery wall and building a gallery wall are not the same thing.
Styling is hanging objects in positions that look considered. Building is adding each piece in a sequence where every decision responds to what’s already mounted — so that by the time the gallery is complete every element is earning its position rather than occupying it.
The Afro Bohemian gallery wall is built in four layers. Each layer adds something the previous layers can’t provide — a different material register, a different scale, a different spatial depth, a different cultural dimension. Skip a layer and the gallery reads as a collection of individually correct pieces rather than a composed system.
This guide covers the full build sequence — from the lighting that makes every surface read correctly to the detail accent that rewards close inspection with cultural specificity.
Quick Takeaway:
- The symbolic textile anchor is mounted first and lived with for one week before any adjacent piece is added — its position sets the center axis that every subsequent piece organizes around.
- The three-dimensional layer — Tonga baskets, carved ebony relief, jute macramé — is added before the detail accents because the three-dimensional pieces create the spatial depth that the flat detail pieces read against.
- Every gallery composition is laid out on the floor before a single nail goes into the wall — the floor layout is the plan, the wall is the execution of a plan already confirmed as correct.
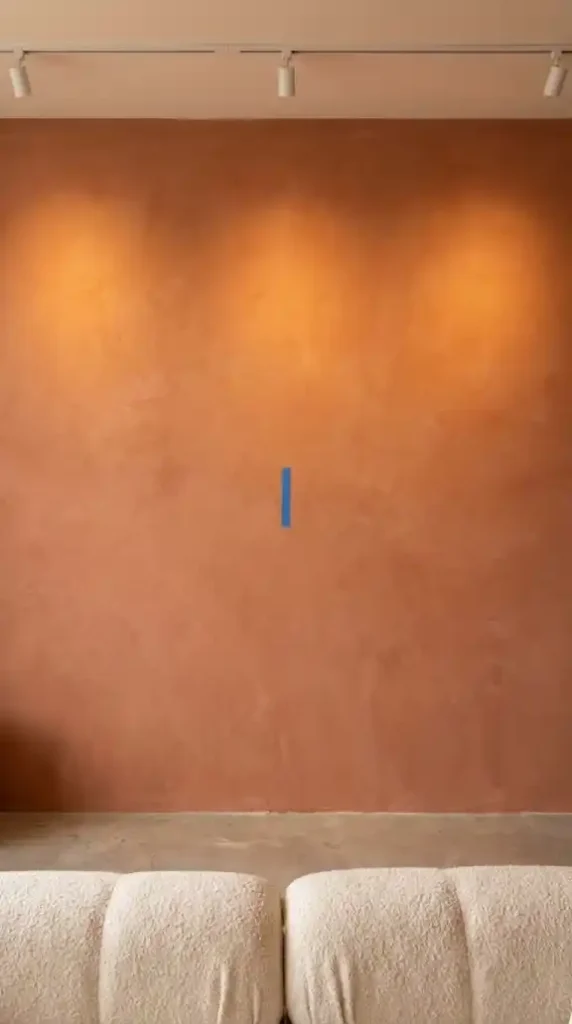
Step 1: Set the Lighting Before the First Nail Goes In

Gallery wall lighting is installed before the first piece is mounted — because the light source determines which pieces will perform correctly in the final composition and which will be flattened by incorrect illumination.
Track lighting at 2700K warm is the correct lighting system for an Afro Bohemian gallery wall.
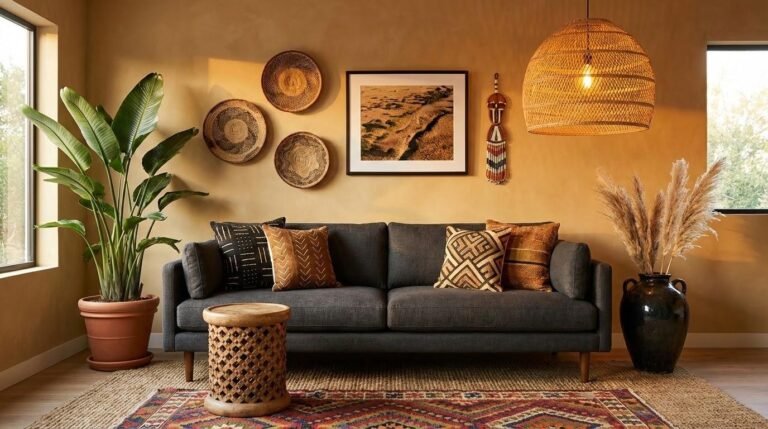
Two track light fixtures angled toward the gallery wall’s center zone create the directional warm light that makes every material in the composition perform at its best. The Kuba cloth raffia surface needs raking warm light to reveal its surface relief depth. The carved ebony wood relief panel needs directional warm light to create the highlight and shadow variation that makes the carving readable from across the room. The hammered brass celestial motif needs warm light to glow amber rather than reading as dull bronze under cool white.
Install the track lighting first. Turn it on and evaluate the lit zone on the bare wall.
The lit zone — the area of wall receiving the most direct warm light — is where the primary gallery anchor goes. The transition zones at the edges of the lit area are where the three-dimensional pieces go — the Tonga basket cluster and the carved wood relief panel performing at their most dramatic in the transition between direct warm light and the adjacent shadow zone.
Confirm that every existing overhead light in the room is also at 2700K before proceeding.
A single cool-white downlight in the room reading simultaneously with the warm track light creates a color temperature conflict that flattens every earth-pigment surface in the gallery regardless of how correct the individual pieces are.
Step 2: Choose the Primary Wall and Identify the Center Axis
The primary gallery wall is the wall the room’s main seating or sleeping position faces — the wall that occupies the largest portion of the primary sightline from the room’s most-used position.
Identify it before buying any wall art piece.
The wall’s width determines the scale of the primary textile anchor. A 300cm wall can hold a 120cm wide Kuba cloth panel with enough surrounding space for the basket cluster and figural pieces on either side. A 180cm wall can hold a 90cm panel with more constrained adjacency. Measure the wall width before confirming the anchor piece purchase.
Mark the wall’s visual center at approximately 165cm from the floor with a small piece of painter’s tape.
This mark is the center axis of the entire gallery composition — the point that the primary textile anchor’s center will align to and that every subsequent piece organizes around. Getting this mark right before anything is mounted is the single decision that most determines whether the final gallery reads as centered and intentional or slightly off and uncertain.
Step 3: Lay the Full Composition on the Floor First
Every piece in the gallery composition goes on the floor in its planned position before a single nail is hammered into the wall.
This is the step most beginners skip — and the one that most consistently produces wrong spacing, competing scale relationships, and gallery arrangements that look correct from the floor but wrong on the actual wall.
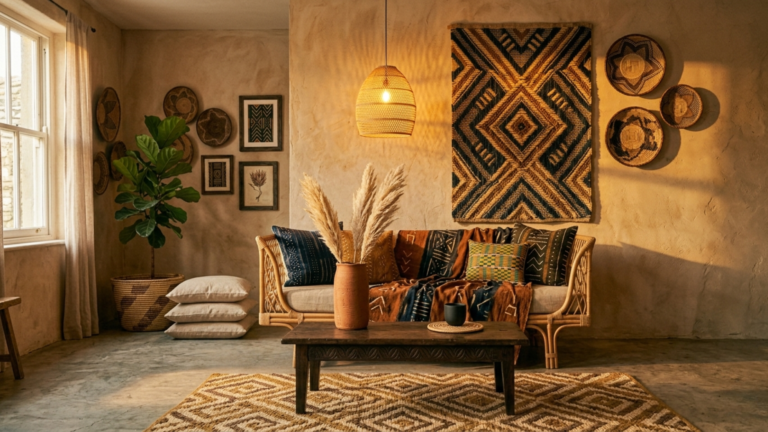
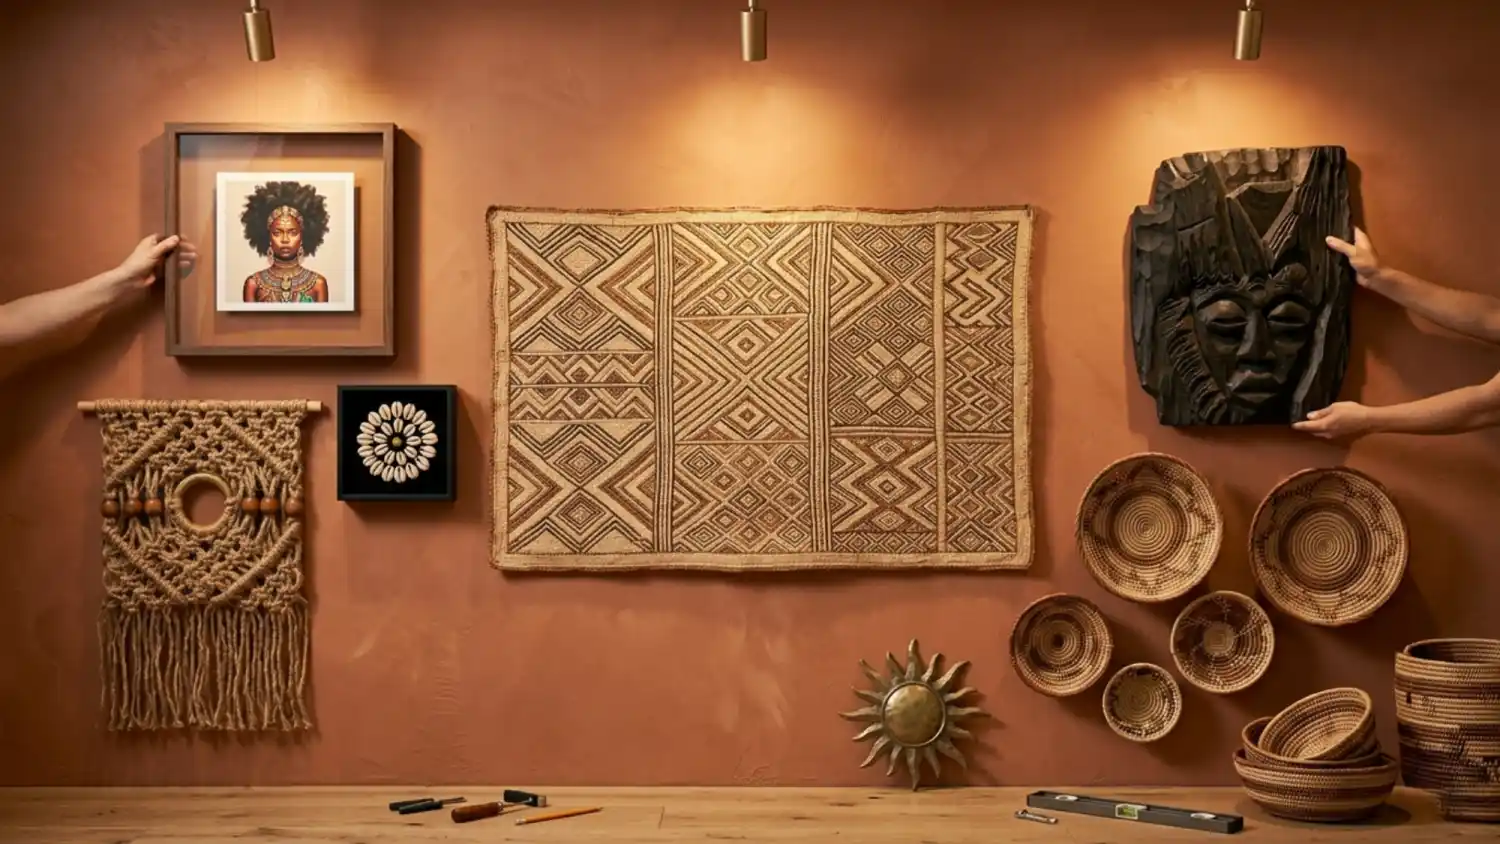
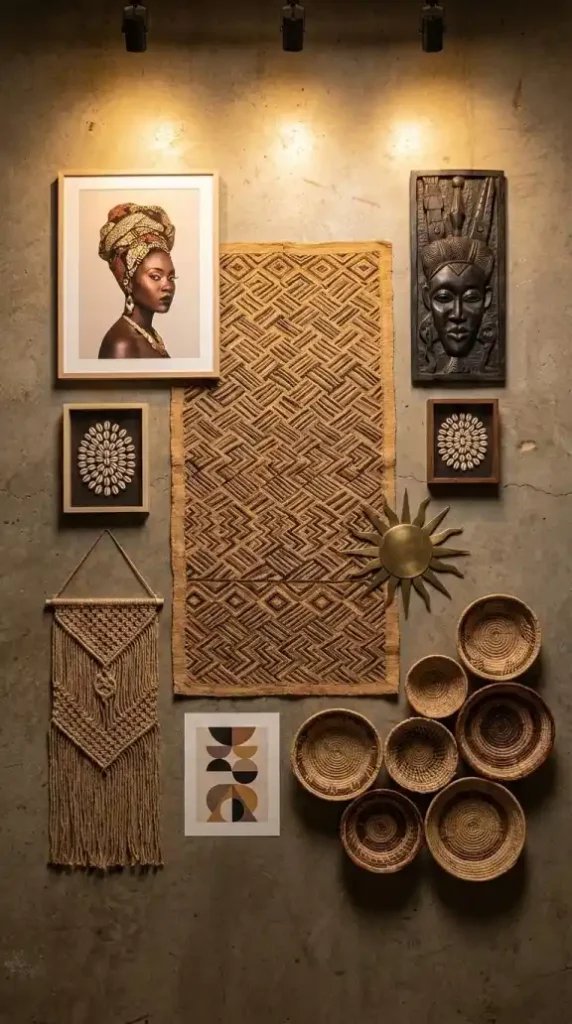
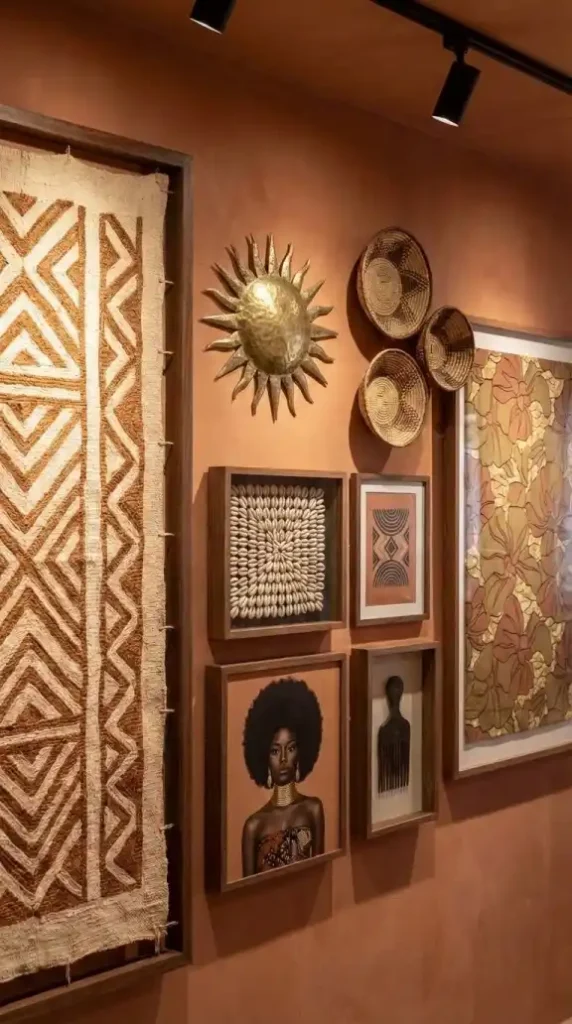
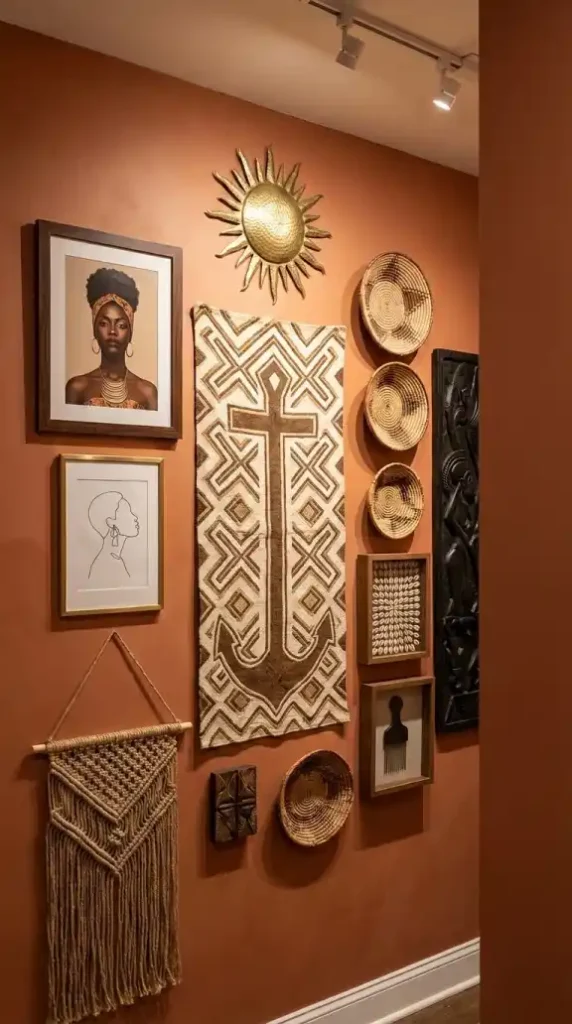
Lay the Kuba cloth panel flat at the floor layout’s center position. Arrange every other piece around it in its intended wall position — the Afro Queen portrait at the upper left, the Tonga basket cluster at the lower right, the carved ebony relief at the upper right, the jute macramé at the lower left, the celestial brass motif between the anchor and the basket cluster, the cowrie shell shadow box and abstract geometry scarification print at the detail positions.
Step back and evaluate the floor layout from a standing position.
Are the scale relationships between pieces correct — does the Kuba cloth read as clearly larger than every other piece? Is the asymmetric arrangement genuinely asymmetric or is it tending toward symmetry at the upper positions? Is there at least one piece that extends into the three-dimensional layer — the baskets or the macramé — that will project from the wall surface?
Adjust the floor layout until every relationship reads correctly before measuring and marking the wall mounting positions.
The floor layout is the plan. The wall is the execution of a plan already confirmed as correct.
Step 4: Mount the Symbolic Textile Anchor
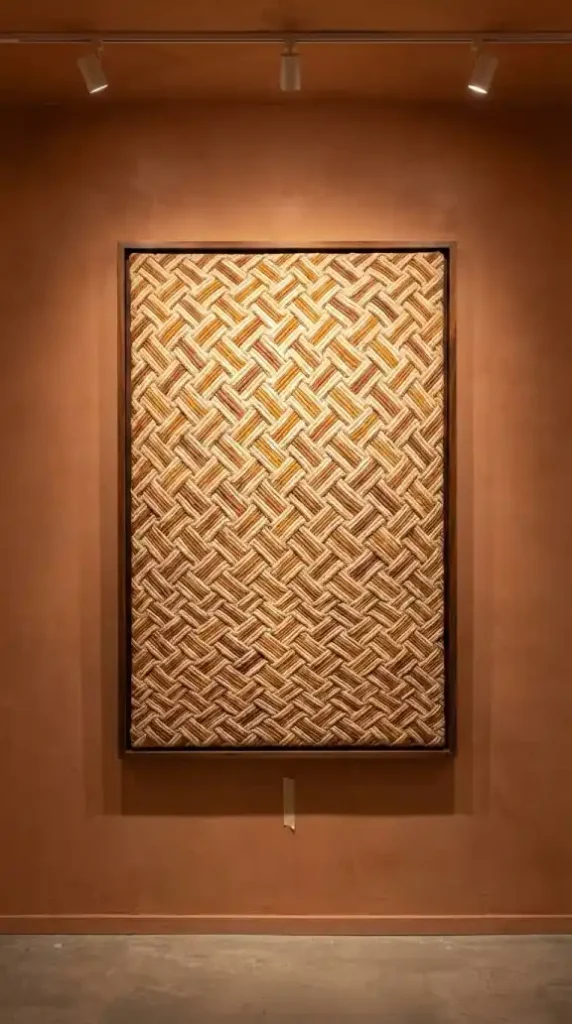
The symbolic textile anchor goes up first — alone on the wall — and stays alone for at least one week before any adjacent piece is added.
Center the Kuba cloth panel on the wall’s visual center axis mark. The panel center should sit at approximately 165cm from the floor — the standard eye-level position that ensures the anchor reads correctly from the primary seated and standing positions in the room.
Once mounted, live with the single panel on the wall for one week.
This week is not optional and it’s not patience for patience’s sake. It gives the eye time to calibrate the panel’s scale and visual weight against the room’s actual spatial context. It reveals which adjacent position the gallery needs next — whether the basket cluster should go to the left or right of the anchor, whether the portrait should sit at a higher or lower height relative to the panel’s center. These decisions are impossible to make correctly from a floor layout. They require the mounted anchor to exist on the actual wall for the eye to read its spatial relationships accurately.
The week also reveals the track light’s behavior on the panel surface across different times of day — morning light versus afternoon versus 2700K-only evening. The panel’s surface should read at its richest under the 2700K track light at night. If it reads flatter under track light than under daylight the track light position needs adjustment before the gallery is built around it.
Step 5: Add the Figural Imagery Layer
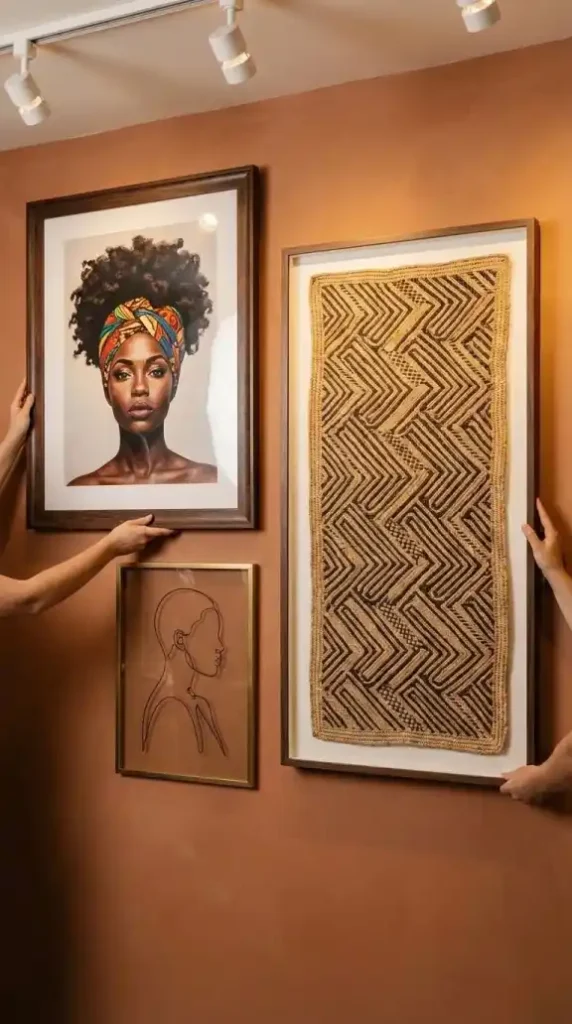
The figural imagery layer is added after the symbolic textile anchor has been lived with on the wall for one week — positioned in response to the anchor’s confirmed scale and visual weight rather than from the floor layout alone.
The Afro Queen portrait goes first within the figural layer.
Position it at the upper left of the Kuba cloth anchor — not directly beside it but with deliberate space between the portrait’s right edge and the anchor’s left edge. That space is not a compositional gap to be filled. It’s the visual breathing room that makes both pieces legible at their own scale before they’re read as part of the same gallery composition.
The portrait’s wide dark wood frame should be at a noticeably different width from the Kuba cloth panel’s stretcher frame — the frame weight differentiation reinforcing the scale hierarchy between the primary anchor and the secondary figural piece.
Once the Afro Queen portrait is mounted, position the continuous-line silhouette drawing beside it at a slightly lower height — the thin brass frame reading as lighter and more contemporary than the wide dark wood portrait frame. The two figural pieces create a figural sub-composition at the gallery’s upper left zone: one bold and colorful, one minimal and linear. One celebrating the details of identity and adornment, one celebrating the organic grace of the figure in movement.
Step back and evaluate the gallery with these three pieces — anchor, portrait, silhouette — before adding the three-dimensional layer.
The three-piece composition should already read as an Afro Bohemian gallery at this stage. If it doesn’t the anchor or portrait size needs to be adjusted before the remaining layers make the issue harder to diagnose.
Step 6: Build the Three-Dimensional Textural Layer
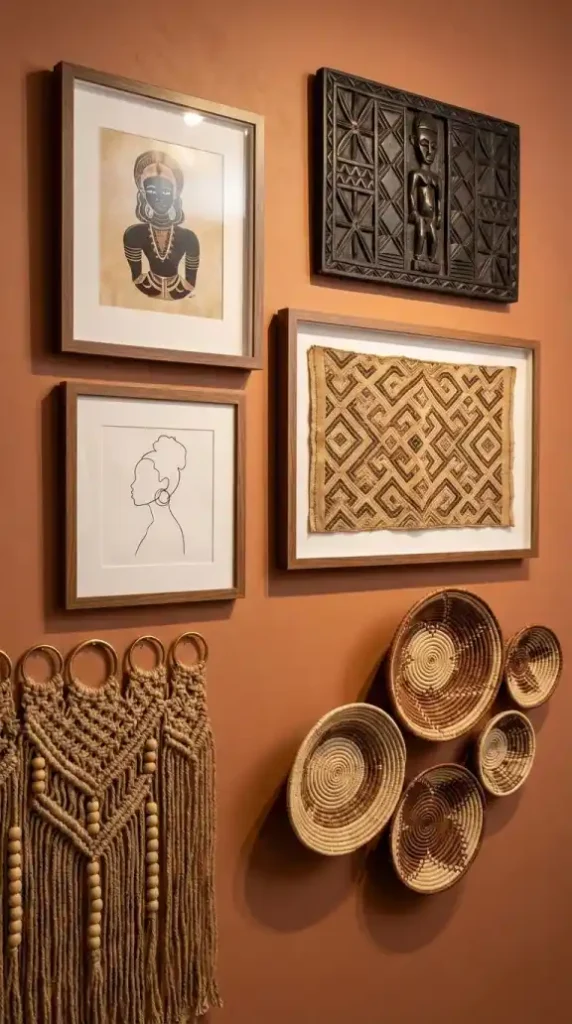
The three-dimensional textural layer is added after the figural imagery is confirmed — because the three-dimensional pieces need to be positioned in response to the compositional weight established by the anchor and portrait rather than placed symmetrically around the gallery’s center.
Three pieces. Three distinct positions. Three distinct spatial depths.
The Tonga basket cluster at the lower right of the anchor — the opposite zone from the Afro Queen portrait at the upper left. The basket cluster’s circular forms create the compositional counterweight to the portrait’s rectangular frame at the opposing diagonal of the gallery composition. Arrange five baskets asymmetrically — one large, two mid-size, two small — with varying heights between them. The cluster as a whole should occupy a similar visual weight zone to the Afro Queen portrait on the opposite side.
The carved ebony wood relief panel at the upper right — positioned so the gallery’s four primary elements create a loose diamond composition: Kuba cloth at center, Afro Queen portrait upper left, carved relief panel upper right, Tonga basket cluster lower right. The diamond structure creates directional movement across the wall — the eye travels between the four points rather than reading the gallery as a static rectangular arrangement.
The jute macramé fiber art hanging at the lower left outer edge — the piece that completes the gallery’s fourth compositional point and extends the material vocabulary into the fiber art register. The rough jute cord surface, wooden beads, and hammered brass rings create material contrast within a single piece that references both the natural fiber vocabulary and the metallic accent thread of the broader gallery composition.
Step 7: Add the Ankara or Kente Print and Botanical Panel
The Ankara or Kente print and the botanical motif panel are added at this stage — filling the compositional gaps within the gallery’s diamond structure with the Vibrant tone palette category that the primarily Grounded and Contrast pieces established so far don’t fully deliver.
The Ankara wax-print fabric in muted gold and terracotta abstract pattern framed under glass fills the gap between the Kuba cloth anchor and the carved ebony relief panel at the upper right zone. Its glass-fronted smooth surface provides the reflective flat element that contrasts with the three-dimensional pieces on either side of it.
The botanical monstera leaf and bird of paradise print on a terracotta background fills the gap at the lower gallery zone — between the basket cluster and the macramé hanging. The botanical motif’s lush earthy imagery connects the wall art system to the living plants in the room’s corner zones — the gallery referencing the botanical layer at the wall art scale.
Both prints should be in dark wood frames matching the Afro Queen portrait frame width — maintaining the frame vocabulary consistency across the gallery’s flat framed pieces while the three-dimensional pieces operate without frames in the adjacent positions.
Step 8: Position the Afro Pick and Cowrie Shell Cultural Artifacts
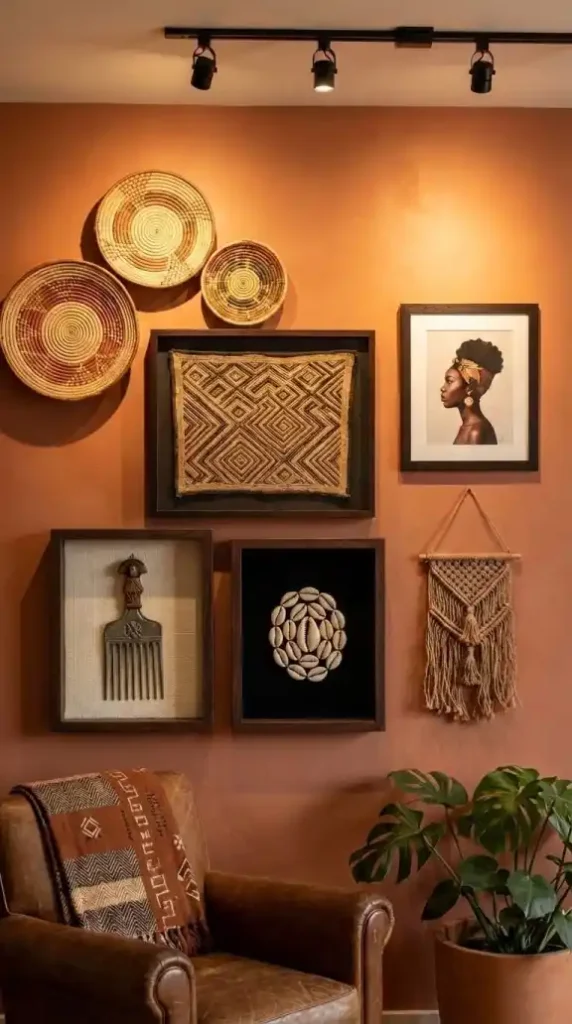
The cultural artifact layer — the Afro pick framed composition and the cowrie shell shadow box — is positioned at the gallery’s detail scale zone at approximately eye level for close viewing.
The Afro pick as a framed cultural artifact brings the specific symbolism of the natural hair movement into the gallery at the object scale — a vintage Afro pick with a decorative handle mounted on textured cream fabric backing in a dark wood shadow box frame reads simultaneously as a cultural artifact and as a three-dimensional art piece. The pick’s metal surface catching warm track light adds a metallic accent element at the detail scale.
The cowrie shell shadow box beside it completes the cultural artifact sub-composition — the two detail-scale pieces with the highest cultural specificity forming a close-range reading zone within the larger gallery.
Position both at the gallery’s most accessible eye-level zone — where the viewer naturally moves to inspect the detail layer after the primary and secondary gallery elements have been processed from across the room.
The cultural artifact pieces should not be visible as primary gallery elements from the entry point. They’re discovered — the gallery’s reward for moving closer. Their cultural significance is most fully communicated at close range where the cowrie shells’ individual forms and the Afro pick’s decorative handle detail can be read clearly.
Step 9: Place the Celestial and Abstract Geometry Accent Pieces
The celestial motif and abstract geometry scarification print are the final detail accent pieces — filling the gallery’s remaining compositional gaps without creating new primary focal elements.
The hammered muted brass celestial sun wall sculpture goes in the compositional gap between the Kuba cloth anchor and the Tonga basket cluster. Its circular form echoes the circular basket forms at a smaller scale and its muted brass surface connects to the brass ring accents in the macramé hanging and the brass frame of the line art silhouette. It functions as a compositional bridge between two primary gallery elements rather than as a standalone accent.
The abstract geometry scarification print — spirals, triangles, and dot patterns referencing traditional body marking traditions in charcoal and cream on terracotta paper — goes at the detail zone beside the cowrie shell shadow box and the Afro pick framed composition. The three detail-scale pieces with the highest cultural specificity now form the gallery’s close-range sub-composition: cowrie shells, Afro pick, and scarification geometry — all readable only at close viewing distance, all carrying cultural references that deepen the gallery’s meaning beyond its visual surface.
Step back from the wall and evaluate the complete gallery for the first time.
All four layers should now be simultaneously visible from the entry point. The primary textile anchor at architectural scale. The figural imagery at the secondary scale. The three-dimensional pieces creating depth across the gallery’s spatial planes. The detail accents rewarding close inspection.
Step 10: Evaluate and Edit Before Adding Anything Else
Once all four layers are in place stop adding before evaluating.
Stand at the room’s entry point and answer these questions before considering any further additions.
Does the eye land on the Kuba cloth anchor within the first two seconds? If it doesn’t the anchor is being visually competed with by an adjacent piece at too similar a scale. Identify the competing piece and either reduce its size or increase its physical distance from the anchor.
Can all four gallery layers be identified simultaneously from the entry point — textile anchor, figural imagery, three-dimensional textural elements, detail accents? If any layer is invisible from this distance it’s either too small or positioned too far in the compositional periphery to read as a gallery element.
Is there bare wall visible around and between the gallery elements? The bare terracotta plaster wall surface between pieces is as important as the pieces themselves — it’s the visual breathing room that makes each element legible at its own scale. If every section of wall is activated the gallery needs editing rather than addition.
Is the composition genuinely asymmetric from the entry point? If it reads as balanced through mirror symmetry rather than through scale and material contrast the most symmetrical element needs to be shifted or replaced with a piece at a different scale.
Are all three palette categories represented in the visible gallery composition — Grounded earth tones, Vibrant cultural accents, High Contrast black and cream? The absent palette category is the next addition if the gallery still needs development. Not a new piece from a category already represented.
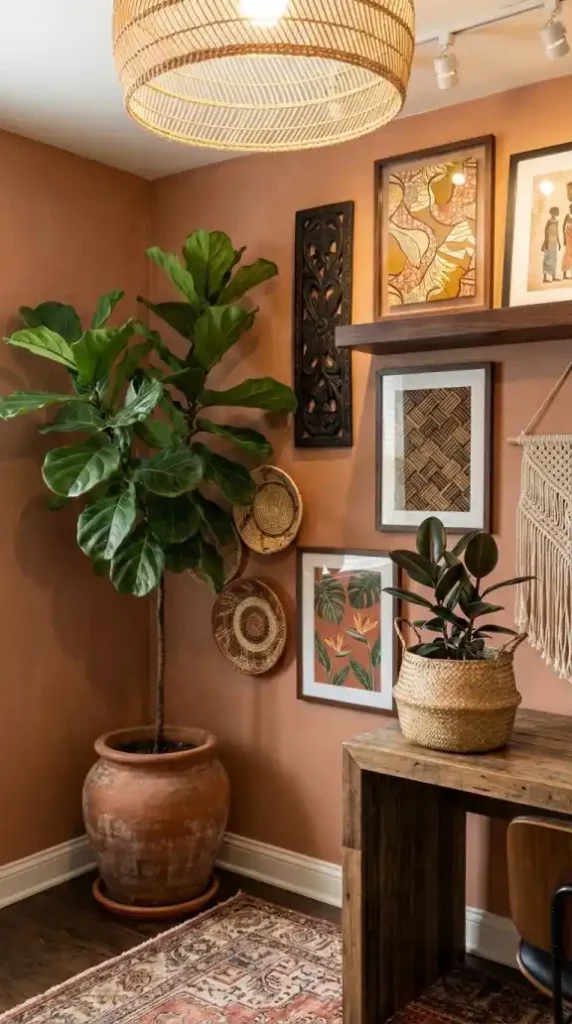
Applying the System at Different Room Scales
The full ten-step sequence applies at the living room and primary bedroom scale where a full gallery wall is available. At smaller scales the system contracts without losing its logic.
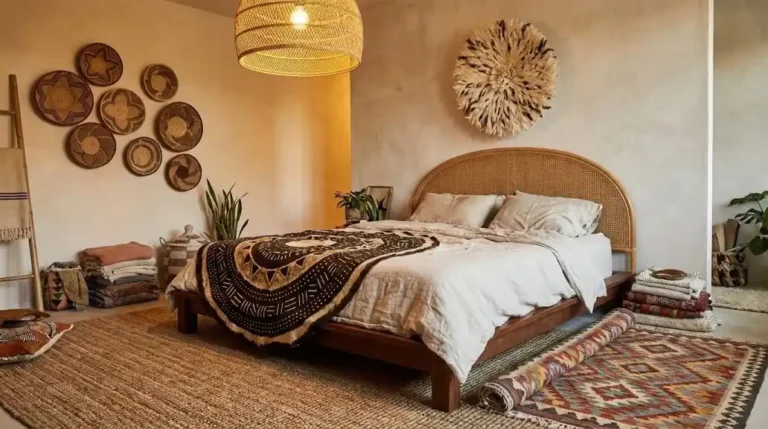
At the hallway scale: one symbolic textile piece — a mud cloth panel hung from a dowel rod — as the primary wall element. One figural piece — a small Afro Queen portrait or line art silhouette in a dark wood frame beside it. One three-dimensional element — a single large Tonga basket hung below the textile panel. The three-layer gallery at hallway scale. Same logic. A fraction of the surface area.
At the single wall section scale: the Kuba cloth anchor alone is a complete wall statement at the smaller scale — one piece at 90cm wide on a 150cm wall section reads as a resolved gallery at its most minimal. Add the Afro Queen portrait and the cowrie shell shadow box and the three-layer system is present without requiring the full seven-piece composition.
At the corner or nook scale: one mud cloth panel hung from a dowel rod beside one Tonga basket hung at a different height. Two pieces. Two distinct material registers. The High-Low wall art logic at its most reduced — and still immediately legible as Afro Bohemian because the cultural specificity of both pieces reads at any scale.
The Afro Bohemian gallery wall is built in ten steps — but the governing principle behind all ten is the same.
Each layer adds what the previous layers can’t provide. The symbolic textile anchor provides the cultural pattern statement at architectural scale. The figural imagery provides the identity and heritage depth. The three-dimensional pieces provide the spatial depth that extends the gallery from the wall surface into the room. The detail accents provide the close-range cultural specificity that rewards sustained engagement with the gallery.
Those four layers operating simultaneously — across three palette categories, across four distinct material registers, across four distinct spatial depths — is what makes an Afro Bohemian gallery wall read as built rather than assembled.
And built walls don’t just look correct. They feel like they were always there.
Keep building your Afro Bohemian gallery wall:
- 11 Afro Bohemian Wall Art Ideas for a Warm and Layered Home — Browse 11 specific wall art moves organized by layer, scale, and material register — each one building the conditions for the next.
- Afro Bohemian Wall Art: The Complete Guide — Study the full four-layer system behind symbolic textiles, figural imagery, and three-dimensional pieces as a unified cultural and material framework.
- Afro Bohemian Wall Art Must-Haves for Beginners — Find out which pieces to prioritize first and why the mounting order matters before buying anything — from the basket cluster anchor to the macro photography layer.